Part 9 – Saving Model Objects, Adding Lighting and Rendering
Saving Model in the Bryce Objects Menu
Saving 3D Model Object Menu
1. Click the "View" arrow ![]() and select Right View.
and select Right View.
![]() 1a. Carefully click, hold and drag a selection marquee around the entire butterfly model to select. Or, Ctrl+Click each part of the object and Ctrl+Shift to add multiple selections from the list in the pop up window.
1a. Carefully click, hold and drag a selection marquee around the entire butterfly model to select. Or, Ctrl+Click each part of the object and Ctrl+Shift to add multiple selections from the list in the pop up window.
![]() 1b. Click the "Group" button
1b. Click the "Group" button ![]() then open the Attributes Menu
then open the Attributes Menu ![]() name it Butterfly and hit the finish check mark
name it Butterfly and hit the finish check mark ![]() or Enter.
or Enter.
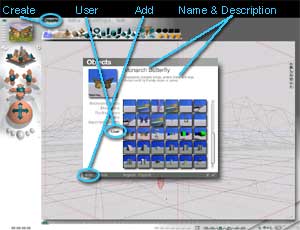
2. Click the "Create" tab. In the pop up window select "User" Click "Add" and name your model.
2a. You can also add a description if you like then hit the finish check mark ![]() or Enter. The model is saved with the texture maps for easy use in other project.
or Enter. The model is saved with the texture maps for easy use in other project.
* Tip: You can import and export other objects into and out of the Objects Menu in either Bryce or .obj format.
Lighting Your Scene
Bryce 3D Create Palette
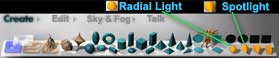
1. Creating a "Spotlight"
![]() 1a. Click "Create", click the "Spotlight"
1a. Click "Create", click the "Spotlight" ![]() icon then the "A"
icon then the "A" ![]() to open the "Object Attributes" Under the "General" tab type in the coordinate settings in the diagram below then click the finish check mark
to open the "Object Attributes" Under the "General" tab type in the coordinate settings in the diagram below then click the finish check mark ![]() .
.
Spotlight Object Attributes

Spotlight Attributes…
Origin X: -83.83, Y: 51.13 and Z: 79.03
Rotate X: 0, Y: 0 and Z: 0
Size X: 20.48, Y: 20.48 and Z: 20.48
1a. "Spotlight" Coordinates
2. Editing the "Spotlight"- Click "E" ![]() to open the "Edit Object" menu.
to open the "Edit Object" menu.
![]() 2a. In the top left widow, click and drag left or right and set to 8.
2a. In the top left widow, click and drag left or right and set to 8.
![]() 2b. In the bottom left widow, click and drag left or right and set to 100.
2b. In the bottom left widow, click and drag left or right and set to 100.
![]() 2c. You can change the color of the light with the small "Color Picker"
2c. You can change the color of the light with the small "Color Picker" ![]() box on the bottom. For this tutorial it is set on white. Click the finish check mark
box on the bottom. For this tutorial it is set on white. Click the finish check mark ![]() or Enter.
or Enter.
Options and Rendering
"Control Render Options" and "Render" button.
1. Checking your settings- When you are ready for the final rendering of your scene you should always double check your settings.
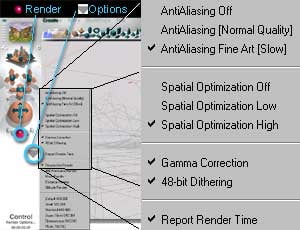
![]() 1a. Click the "Control Render Options" (bottom arrow on the lower left side of the scene window)
1a. Click the "Control Render Options" (bottom arrow on the lower left side of the scene window)
![]() 1b. Check
1b. Check ![]() AntiAutodesking Fine Art (Slow),
AntiAutodesking Fine Art (Slow), ![]() ,
, ![]() Spatial Optimization (High),
Spatial Optimization (High), ![]() ,
, ![]() Gamma Correction,
Gamma Correction, ![]() ,
, ![]() 48 Bit Dithering, and
48 Bit Dithering, and ![]() ,
, ![]() Perspective Render.
Perspective Render.
1c. Finally, Click the "Render" button and go have a yours self a nice long lunch!
2 Saving your rendered image-
![]() 2a. Click File > Save Image As… In the pop up window chose a place for your file to be saved, name it, save in .psd or .tif format and click Save.
2a. Click File > Save Image As… In the pop up window chose a place for your file to be saved, name it, save in .psd or .tif format and click Save.
![]() 2b. Close Bryce. When prompted to save, click Save.
2b. Close Bryce. When prompted to save, click Save.
Finally… Pat yourself on the back and jump up and down a few times!
Cheers,
Ralph