The Sky Lab and Rendering in Bryce 3D
The Sky Lab

The Multiple ways to Open the Skylab
1 Click "Sky & Fog" then single click the ![]() "Sky Lab" button (the cloud with a rainbow) or, double click the "Sun Control" dial or, (Ctrl+K) to enter the "Sky Lab"
"Sky Lab" button (the cloud with a rainbow) or, double click the "Sun Control" dial or, (Ctrl+K) to enter the "Sky Lab"
Disabling Sun Light in the "Sky Lab"
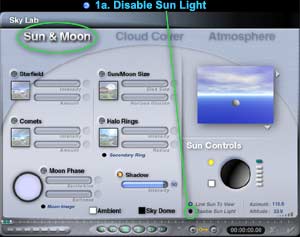
![]() 1a. In the Sun & Moon Controls window click "Disable Sun Light" and a selected icon will appear
1a. In the Sun & Moon Controls window click "Disable Sun Light" and a selected icon will appear ![]() . Click the finish check mark
. Click the finish check mark ![]() .
.
Options and Rendering
"Control Render Options" and Render button.
1. Checking your settings- When you are ready for the final rendering of your scene you should always double check your settings.
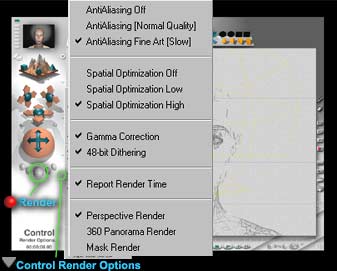
![]() 1a. Click the "Control Render Options" (bottom arrow on the lower left side of the scene window)
1a. Click the "Control Render Options" (bottom arrow on the lower left side of the scene window)
![]() 1b. Check
1b. Check ![]() AntiAutodesking Fine Art (Slow),
AntiAutodesking Fine Art (Slow), ![]() ,
, ![]() Spatial Optimization (High),
Spatial Optimization (High), ![]() ,
, ![]() Gamma Correction,
Gamma Correction, ![]() ,
, ![]() 48 Bit Dithering, and
48 Bit Dithering, and ![]() ,
, ![]() Perspective Render.
Perspective Render.
1c. Finally, Click the "Render" button and go have a yours self a nice long lunch!
2 Saving your rendered image-
![]() 2a. Click File > Save Image As… In the pop up window chose a place for your file to be saved, name it, save in .psd or .tif format and click Save.
2a. Click File > Save Image As… In the pop up window chose a place for your file to be saved, name it, save in .psd or .tif format and click Save.
![]() 2b. Close Bryce. When prompted to save, click Save.
2b. Close Bryce. When prompted to save, click Save.