Drupal 6/Ubercart 2/Node Import – Updating Products & Prices Via CSV Import Tutorial

First, Drupal & list of modules and applications needed:
Download and install modules in the usual manner and appropriate place for your installation. Usually, sites/all/modules.
- Drupal 6
- Node Import
- Node Import Update
- Node Import Update Patch
- Ubercart 2 (Upgrade or use the Development Version until 6.x-2.8 or later is released)
- Stock & Price CSV Updater 2 (Put in ubercart/contrib)
- OpenOffice (For creating CSV files)
- Notepad++ (For general text editing)
Pre-Tutorial Preparation Notes
Always backup your database before trying new modules, tutorials and making major changes to your installations. For information on backing up your database.
I highly recommend completing a backup of your site before continuing with this tutorial. Using these techniques incorrectly can delete, overwrite and do a lot of damage to your site!
Got to: Site building> Modules (admin/build/modules) and turn on:
Ubercart – core (optional)> Product attributes
Ubercart – extra> Stock and Stock and Price Updater
To use these methods there are some basic methods of setting up your store that need to be followed. One is that it is a good practice and a must for updating your attributes options with this tutorial that you create one or more product classes (content types) to add your products with instead of using the default built-in Ubercart “Product” content type.
Go to: Store administration> Product> Manage classes (admin/store/products/classes) and fill out form to create a personalized product class (content type) for your store. Example…
Class ID: *
t_shirt_product
Class name: *
T-shirt product
Description:
Create a T-shirt product node with attributes and options that include all the unique information that can be attributed to a specific model number or SKU.
Note: If you already have a Drupal/Ubercart site and store and have already created all your products with the default built-in Ubercart “Product” content type, you will not be able to use the Ubercart attribute bulk update feature that allows you to bulk update attribute option prices unless you change all of the products on your site to a product class other than the default built-in Ubercart “Product” content type. This entails creating a product class for your store and then manually hacking the database which should only be done with much care and with a database backup stashed away to roll back on in case things go wrong. It’s really not that hard if you know what you are doing.
![]()
Creating a .CSV import file to “Import” product information
1. Download and install OpenOffice.
2. Download the sample OpenOffice product CSV file, unzip and open the “product-sample.csv” document and “Save As” whatever you want to call your CSV file. 
Note: The “Name” column is actually your products title. This is important to note for search engine optimization as it will ultimately be the title as well as the URL of your products pages. Also, worth noting is that you can use HTML in the Description column.
3. Edit the CSV file and add other applicable columns if you like and change everything to suit your products name, SKU, price, weight, description etc. Add each product in a new line.
- By default you must have inputs for Name, Sell Price and SKU or the import will fail.
- If you want to use images for your products, you must upload the original product image to your sites”files” directory only or the import will fail.
- To use Shipping by weight, USPS, UPS and or FedEx modules for shipping methods, you must fill in the Weight, Length, Width and Height columns for each product or the import will fail.
- If you have settings for taxes set up then change the Tax column from 0 to 1.
Note: If you are going to be adding Attributes and Options to some of your products, you will be able to do this after you upload the default products with their SKUs and prices.
Note: When editing your CSV file for the purpose updating the information of your products (like price changes) it is vital that you do not change the Name column. The node_import module finds items by the items Name. so, if you change the name either on the site or in the CSV, it will not be found for update during and import/update. You can change the Names/Titles of your pages as long as you update the changes in you CSV files as well.
4. Save the file as a Text CSV with the following settings:
- Keep current Settings
- Character set: Western Europe (Windows-1252/Winlatin 1)
- Field delimiter: , (Comma)
- Text delimiter: ” (Double quotes)
- Check “Save cell content as shown”
- OK
You will get a pop up… “Warning! Saving the document product-sample: Only the active sheet was saved” Click “OK”.
Importing the .CSV file with the Node_Import module
Once you have a batch of products ready to import and the images uploaded to the “files” directory it is time to start the import process.
1. Go to: Content management > Import content > New import and hit “Next”.
http://www.My-Website.com/admin/content/node_import/add
2. Select your “Product content type” then “Next”.
3. Click the “Upload file” link and Browse to your CSV document and hit “Upload”.
Set file options (step 3 of 8)
If your Sample data looks like the image below, then you need to adjust the settings as per image directions:

In this example, “Sample data:” shows the first row in double quotes which is incorrect. If your sample looks like this, make adjustments as in 1., 2., 3. and the “Reload page” button or your import will fail.
(Do not hit your browsers reload button or you will have to start over from the beginning!)
To correct the file format:

In this example, “Sample data:” shows the first row without double quotes. When it looks like this you can hit “Next”
Map file columns (step 4 of 8)
Make sure that the proper Content field Maps to the correct column:
Example: Name to Name, Description to Description SKU to SKU, image to Image etc. Click here or image below to se full example.
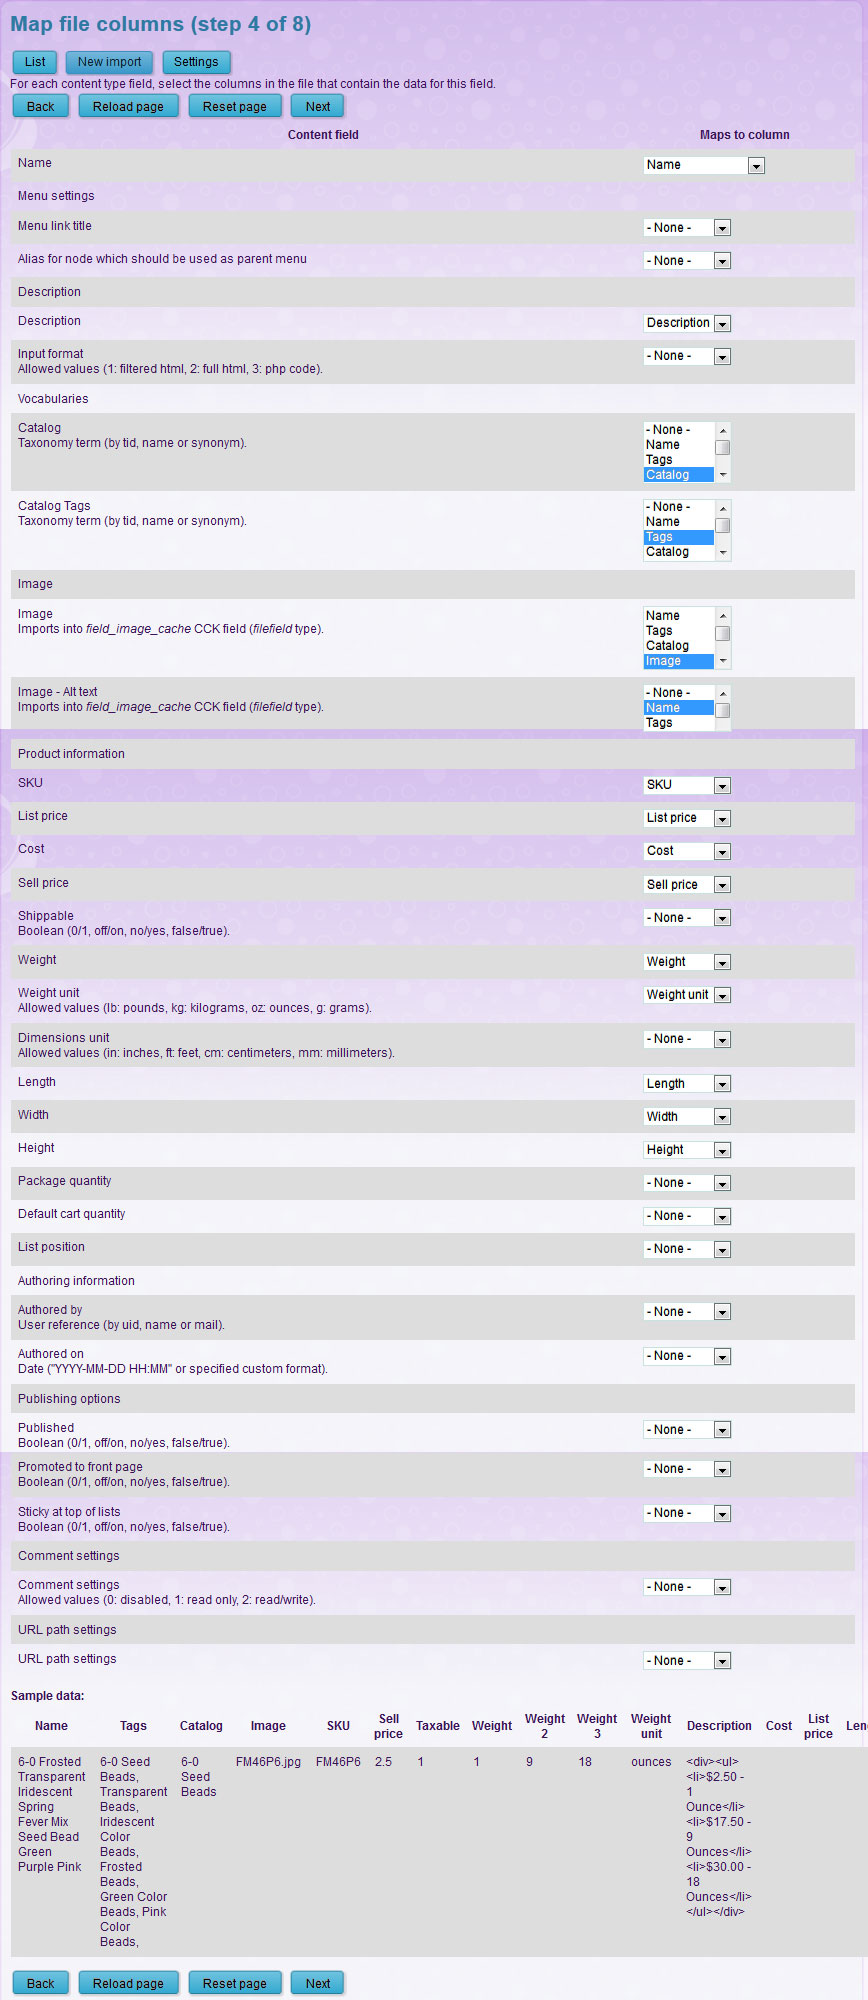
Note: There is a taxonomy import bug in the Node Import module that is still under development.
Important: When you create a new vocabulary in D6 the database table “vocabulary” will have “hierarchy” set to 0 by default but, as soon as you enter any terms, it’s set to “1” and node_import seems to have a problem with this. To import taxonomy terms and hierarchy, you will need to have you database administrator set the table “vocabulary” > name “tags” or any other named tages that pertain to you import taxonomies to “0” zero before you attempt to import new or revised CSV files. The taxonomies will not appear in the preview but, they will import correctly.
Set import options (step 5 of 8)
1. Check “Replace existing node if key already present” if you are updating products.
2. Select the >> In “Hierarchy is specified by” and delete it!
3. Hit “Next”

Set default values (step 6 of 8)
You can skip this step unless you find something that you wish to adjust on this page.
Preview import (step 7 of 8)
You may want to get a larger preview of item other than 5 to make sure most of your products will import correctly. To do so:
1. Set “Number of records to preview: ” to a larger number.
2. Hit the “Reload page” button. (not your browsers reload button!).
If you are missing images, upload the original size image to your sites “files” directory and hit the “Reload page” button.
If you see any errors pertaining to other missing or incorrectly formatted items, repair the items and start again from the beginning.

If you do not see any warnings or errors on the preview page then you age good to go, hit “Next”
Start import (step 8 of 8)
Click “Start import” and let the uploading finish completely. This may take a while depending on how many products you are uploading.
Upon completion, if you do not get any warnings then you can go view your new products on the content page>
http://www.My-Website.com/admin/content/node
If you get any failure warnings, download the error file and use the info mat ion in it to repair the errors then create a new CSV file and add the repaired items to it and upload it as a supplemental file.