
The Drupal CKEditor Interface
![]() = Drupal 6 |
= Drupal 6 | ![]() = Drupal 7
= Drupal 7
Drupal website CKeditor tutorial – Creating and Editing Content and Blog Posts
In a nutshell…
- Log in
- Go to a page and hit “Edit” or, from the very top admin menu (in black) Content > Add Content.
- Add your Title, click on and use the “Summary” and add a 150 character Meta Tag description for the search engines.
- Add text and images. (To add images… Refer to the tutorial further down.)
- On the bottom of the page, hit “Meta tags” and type or, paste in the 65-70 character page title. for the search engines.
- DO NOT FORGET TO HIT “SAVE”!!!
In detail…
You must log in before you can edit or add content to your site. You can log in at:
http://www.Your-Infinitee-Website.com/user
(Replace "http://www.Your-Infinitee-Website.com" with your website's URL address)
All content, pages, blog posts, articles etc… are listed on the Content page and links to edit these pages are there as well:
Content management > Content
http://www.Your-Infinitee-Website.com/admin/content
Content
http://www.Your-Infinitee-Website.com/admin/content
Note: Microsoft Word and other text editors add a lot of unnecessary code and non conforming formatting styles. It is best to just type out your initial page and blog text in Notepad (All programs> Accessories> Notepad) or preferably Notepad++ (my text editor of choice… Free & open source available at: http://notepad-plus-plus.org/) If you already have a word document or are copying content from a website that has it’s own HTML and CSS formatting, it is best to copy (Ctrl+C) and past (Ctrl+V) the text into Notepad then copy that text from Notepad and past it into the CKEditor text field. This will remove all formatting and the will result will be ideal WWW code conforming textual output.
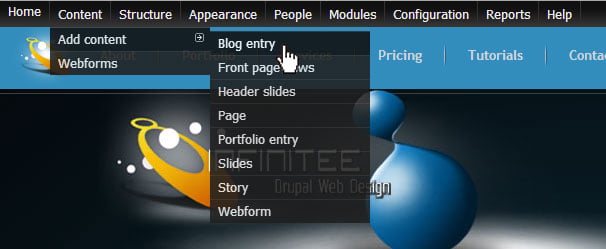
1. Go to one of the Add content type pages that best fits the type of addition you want to add. Usually Blog or Page. From the administration menu: Content > Add content >
Direct link path Drupal 6:
Content management > Create content > Blog entry
http://www.Your-Infinitee-Website.com/node/add/blog
Content management > Create content > Page
http://www.Your-Infinitee-Website.com/node/add/page
Direct link path Drupal 7:
Content > Add content > Blog entry
http://www.Your-Infinitee-Website.com/node/add/blog
Content > Add content > Page
http://www.Your-Infinitee-Website.com/node/add/page
2. Add a Title (*Make it descriptive and use keywords that might be used by someone searching for this page. No more than 60 characters including spaces!)
Example: About Us, FAQ or Frequently Asked Questions about what we do.
*It is very important for search engine optimization that the title contain no more than 60 characters including spaces and punctuation and utilize as many keywords that pertain to the page as possible and still be coherent English.
3. Summery – Drupal 7 sites only. IMPORTANT… Click (Edit summery) to open the summery field. The summery field is used by the search engines as the description of the page. Due to strict restritions by the search engines, the description should not be more than 150 characters including spaces and puncuation. Create the description using as many keywords pertaining to the page as possible and still be coherent English.
4. Body – Using the Text Editor – Add your textual content and or, an image. Type in your text or copy (Ctrl + C) and paste (Ctrl + V) text from another text program like Notepad (Start > All Programs > Accessories > Notepad) Do not use MS Word or Wordpad. If your text was created in Word or Wordpad, copy (Ctrl + C) and paste (Ctrl + V) the text from word to Notepad to remove formatting and then copy and paste it into the CKeditor text area. (do not to USE ALL CAPS, this is considered SHOUTING, (except maybe to emphasize title headers) and use a spell checker!!
Uploading images from your computer with the File Browser.

Note: You can create thumbnails while you are uploading your images… Check mark the thumbnail sizes that you would like to create before you hit “Upload”.
4a. To add an image, click on the small “Image Icon” ![]()
4b. To make an image or a piece of text into a link, select the text or image to activate it and then click on the “Link Icon” ![]()
Example:
www.Your-Favorite-Website.com/my-favorite-link.html
Note that the http:// is already in place so, do not add a full link address with the http://
Example:
http://
www.Your-Favorite-Website.com/my-favorite-link.html
just add
www.Your-Favorite-Website.com/my-favorite-link.html
.
4c. If you have a blog post that is very long and want to shorten it’s length on the front page you can click at the point in which you want to create a teaser and then click the “Teaser” button. This will cut off the rest of the post and leave a “Read more” link to the rest of your post.
1. To add a new pageor post to a menu, click the “Menu settings” link and give the link a title. For a “Parent item” (top level menu link) select Primary links and hit Save. Once you have created a Primary link you can add Sub menu links to it. While editing a page or post, you can add the page as a primary or, a child link. (For a “Child link” (under a primary link) hit the down arrow under “Parent item” and scroll to the parent item and select it. Note: A Primary must be created first.)
2b. Once you have created a primary link and you want to add a sub menu link (child link) to it you need to got to:
Site building > Menus > Primary
http://www.Your-Infinitee-Website.com/admin/build/menu
Structure > Menus > Main
http://www.Your-Infinitee-Website.com/admin/structure/menu/manage/main-menu
and click the “Expanded” check box to enable sub links capability.

Primary links interface – Re-ordering links and enabling sub menu links.
2c. To add a sub menu link item (Child) to a Primary link, go to:
Site building > Menus > Primary
http://www.Your-Infinitee-Website.com/admin/build/menu
Structure > Menus > Main
http://www.Your-Infinitee-Website.com/admin/structure/menu/manage/main-menu
Add a Title for the link then select the menu item to sub it under.
Note: You can change the position of the link in the menu list by click and dragging the control handle 
2d. To add a sub menu link to a sub menu, (Sub sub link – Grand child) repeat the previous steps except, select the sub menu item to add another menu to. Remember to check “Expanded” and “Save configuration” on the
http://www.Your-Infinitee-Website.com/admin/build/menu
page so the sub menus will be initiated.
| Creating a Primary Link | Adding a Sub Menu Link to a Primary | Adding a Sub Menu to a Sub Menu |
 |  |  |
Note: You must create and save a page or post first before you will be able to re-position the link to page or post using the menu GUI.
While you are adding new content or editing, pages, blog posts, articles etc., you can add an image by clicking on the image icon.
1. Once the “Image Properties” editor has loaded you can either add the URL address of an image if you know it or hit “Browse Server” to select an image that is already available on your site or click on the upload link on the upper left to upload an image from your computer.
Tip: When adding images it is important to add a description of the image in the “Alternative Text” field. This is helpful to the visually impaired and it serves as definitions for the search engines as well.
You can also force the image to the left or right of the page with “Align” left or right. Once you hit OK and have added your image you can click and drag it to any place in the editor. Usually if you add an image to a blog post with some text, you will need to add a “Teaser” 
Click “Switch to plane text editor” to add HTML coded content, then click again to bring up the CKeditor and you can edit text format, make text bold, add images, etc. (Only use this option lf you know your HTML code is good! There are filters that will fix most broken HTML and adding Java Script is not allowed)
For most of our sites we create default meta tags that will automatically be filled into the meta tag fields whenever a new page or blog post is created. It is highly recommended that you take the time and carefully adjust these fields to reflect the content of the new page or post you are creating using these guidelines. Following these steps will increase the chances of the new content to be added to the major search engines.
1. Click the “Meta Tags” link and for “Title” or “Abstract” type in or copy and past in the same information you used for your page title (in the first field up top). (Should be no more than 60 characters).
2. For “Description”, type in or copy and past in the same information you used for your page title and then elaborate on it a little (Should be no more than 150 characters).
3. Note: Keywords are no longer utilized by most search engines… For “Keywords”, type in or copy and past in the same information you used for your page title to the beginning of the list comma separated. Example: Drupal, Tutorials, Web Design Tutorials, Drupal Tutorials, Adding, Blog Post, web Pages, CKeditor, CKeditor tutorial. If they don’t all fit you sill need to eliminate enough of the keywords from the end of the list to fit the new ones in the front.
Note: For a more in depth understanding of how to create Meta Tags for search engine optimization, read the “Perfect Meta Tags” tutorial.
Note: This only applies to Drupal 6 websites. All Drupal 7 websites have been pre-configured to automatically create Title and Description meta tags!
1. You can leave the “URL path settings” alone and it will automatically create one for you or un-check “Automatic alias” and give the page a logical address of your choice Example: (use hyphens to separate words) faq-frequently-asked-questions.
2. “Publishing options” Always leave “Published” checked and optionally, if you would like the new post to be published to the front page then select that one as well. To force a post always be on the top, check “Sticky at top of lists”.
3. Hit submit and review your page. If you need to revise anything just hit “Edit” and make whatever changes you like again and again until it is perfect. Have fun!!! make some appropriate text bold, add some color and images… think like an advertising executive!
Most of the site we build will have the “URL path settings” set to automatically create the address for you (this is set in a way that is best for search engine optimization) but, if you would like to specify particular address of your own,
1. Uncheck “Automatic alias”
2. Type in an alternative URL using keywords that reflect the pages content.
Note: Changing content and adding new pages and blog posts is fine but, it is not a good idea to change the URL/link address’ of old content. The URLs that have been on the site for a while have been picked up and cataloged by the search engines. If you change an address, it will take some time for the search engines to change the listings and people that try to follow the old links and bookmarks will get “404 page not found errors”.
I should not have to say this but… PROMOTE YOUR CONTENT! It is extremely advantageous to frequently add new blog posts about important updates, events and shows at least one week before the event. Just adding simple updates with minor information is valuable to show the major search engines that the site is actively participating in social media marketing.
After creating new content or blog posts, hit the social networking buttons for each account that you have to help promote the updates to a mass market. The exposure that your content will get on social media site like Facebook and Twitter should be a major factor in your marketing strategies!

Tip: Drupal 7 websites utilize contextual links to quickly access and edit block content within regions of your web pages. The contextual link icon 

Drupal 7 Contextual links trigger icon and “Configure block” link.
Download this Tutorial > |  |  |
Call me anytime if you have any questions and…
Have fun! | Email
Ralph Manis – Infinitee Drupal Web Design