Autodesk 3D Studio Max Tutorials
3D Studio Max Tutorials -3D Studio Max modeling & rendering tutorials, animation, tips, tricks, Websites, resources, plug-ins, models, meshes, textures, materials, animation, education, lessons & training.

![]()

# | A | B | C | D | E | F | G | H | I | J | K | L | M | N | O | P | Q | R | S | T | U | V | W | X | Y | Z

Creating virtual 360 Panorama using 3ds Max. 3D Panorama will let us see a three-dimensional picture of the visualization using the virtual camera, turn it and watch for any point around the full 360 degrees, as well as zoom in and out.

In this tutorial we cover concepts and procedures for architectural modeling, building 3D objects, generating objects from curves or shapes. In this tutorial you will learn how to build and model Complete Corporate Architectural Building from scratch to final.

This tutorial is designed for advanced 3ds maxers, I plan to cover how to create an asteroid in 3D studio max using only max’s standard plugins. Essentially most of the work in creating the asteroid is done through three areas, particles, lighting and texturing.
All three of these areas are what make up the asteroids actual look and feel. Particles are what makes the actual form and shape plus motion, texturing makes the real look and shape of the asteroid, whereas lighting controls the real coloring of the particle system, although a lot of the color can be portrayed through the diffuse channel in the material editor the colour is quite dull and lacks any real expression, the lighting really controls the look when it comes to lighting with the asteroid.

This is a very simple tutorial describing how to animate a ball or a wheel rolling down an irregular path. It was devised by my in answer to a need for a car which could drive around corners but still have the wheels rotate accordingly. I assume you know a fair amount about MAX and won’t bother explaining every little detail.

This tutorial will show you how to model a highly detailed basketball in 3D Studio Max using box modeling techniques. This tutorial is suitable for beginners but assume some basic knowledge.

This tutorial covers some of the interesting steps of producing this image. starting with what sparked the idea, and covering the modeling, texturing, rendering and compositing. I will also share a few tips and tricks as I show the process.

Advanced multi-channel texturing in Max – My main focus on the Blood Knight was the texturing / shading, I’ve used a unique method I like to call multi-channel texturing and in this focused making-of tutorial I will share the process, considerations and a few other tips.

This article gives a basic overview of how to created a 3D anime character. It is loosely based off of a spline modeling tutorial from Hash Animation Master. While it utilizes 3D Studio MAX r2.5 as in the example here, the basic principles should be useful even if modeling with other packages, such as Lightwave’s Metanurbs, or even splines in AM. Some sections of this article only give an overview, and show the basic low poly mesh. Is it assumed that the reader has or will have the basic 3D skills to create and model their own characters, using what is here as a guide.

Boolean compound objects. This assignment will introduce you to 3-dimensional Boolean operations in 3DS Max.

Bouncing Balls in a Cityscape – Reactor
Tutorial covering the basics of reactor providing a step by step guide to getting balls bouncing off a surface – in our case a city. Also includes links to the tutorials detailing the building of the city.

When the Z3 was introduced back in 1996 many were shocked by the aggressive styling of this German 2-seater. Everybody thought then that the Z3 is a very beautiful car to say the least.

Cloning and the Xform Modifier (Daisy) We will be making a couple of flowers which blow in the wind.

After you are through with this tutorial you will know how to create realistic clouds with volume fog. Volume clouds are processor intensive when rendering. This file can be downloaded at the bottom of the page.

This is a very simple tutorial demonstrating how to take 2D video footage and composite a 3D animated object in the scene. I’m not going to go into every specific MAX feature and option used, Instead I’ll be concentrating more on the actual process and flow of work and files.

This tutorial essentially covers creating all the geometry that’s in a photo and matching up the camera to the photo along with using camera map and other useful max tools to make a complex 3D scene.

Compositing
Debris Flying at Screen
Lets say you wanted to make an explosion, blowing an object up and making debris fly at the screen, of course rather than using CG fire which a lot of the time looks, well… CG. You might want to use stock footage, video footage of fire which you can overlay into your 3D scene making the explosion look a lot more realistic.

The idea was to have a ball roll down the hill and crash into the rock statue knocking it to pieces like a bowling ball striking down a bowling pin (but this shatters into rocky debris). I wanted this to be a one night project, the effect was simple and I didn’t see why it would take more than a few hours to make.

The idea was to have a ball roll down the hill and crash into the rock statue knocking it to pieces like a bowling ball striking down a bowling pin (but this shatters into rocky debris). I wanted this to be a one night project, the effect was simple and I didn’t see why it would take more than a few hours to make.

This tutorials will show you how to get a really cool glass-crystal effect.

Your end results, if you render the supplied file, should look similar to the original picture supplied. However, the file is a slightly simplified version so it won’t look exactly the same. BTW, use ‘Render Region’ to get the right shape or crop afterwards as it’s ugly with the default aspect.

In this tutorial I will cover some of the interesting steps of this project. I will cover modeling and rigging in general, texturing, working with complex hairs, rendering and compositing. I will also share a few tips and tricks as I show the process.

This is more of a tip than a tutorial. Im going to explain how to save your renders including the alpha channel, and how to delete the unwanted background in Photoshop.

Eyes, perhaps one of the more critical and emotive parts of a character, can be difficult to setup. This tutorial shows how to rig a basic spherical cartoony eye rig in 3D Studio MAX, though the basic principles should carry over to other packages.

The NURMS (Non-Rational Mesh Smooth) or Subdivision Surface technique uses low-polygonal mesh to control the shape of the smooth surface.

Fire
Creating Fire in 3DSMAX by Allan McKay. Before we start you will need one plugin for this tutorial, it isn’t a necessity but I’ve chosen to put it in just to save time making thin tendrils, it’s a free plugin though from Blur Studios and you can download the plugin.

Using ‘Greeble’ in 3D Max to quickly build a city, Part 2. Part 1 includes using Greeble to create a Skyscraper. If your new to Greeble take a look at the first part of our tutorial: Greeble a 3D City: Tutorial 1: Greeble Skyscraper.

“A Bumpy Guitar” Modeling a Les Paul with 3D Studio Max.

HDR Rendering for Photorealistic Imaging
In this tutorial we explain what is the HDR rendering and how you can control the brightness of the final render using it, easily getting rich and outstanding pictures. This tutorial answers the following questions: – What is HDR? – What does LDRI mean? – How to post-process HDRIs using Photoshop? – How to render HDRIs from V-Ray? – Which image format is the best to save HDR renders? – How to deal with over brights in the window and near it? – How to lighten the dark rendering?

This tutorial is for advanced users. Before reading this, please have a working knowledge of 3Dstudio Max’s “New IK”, or IK in general. In this tutorial you will be using 3D-Studio Max’s “New IK”, and Expressions to create 2 advanced setups.

A very extensive tutorial that includes creating a character from A to Z, modeling, textures and skinning. Image Templates provided. Tutorial by Michel Roger.

Create Karamenods Cell (slime) This tutorial learns you how to make Karamendos cell (slime). This is a very simple, step by step tutorial for beginners and intermediate 3ds Max users. There is three chapter : 1. Modeling 2. Materials 3. Light

Modeling and texturing a stainless steel kitchen sink. Page goes to a ink is to a PDF download.

Lighting
3DS Max 5 has new Advanced Lighting features such as the Light Tracer. In this exercise, you’ll use a Skylight and Light Tracer to add realism to an outdoor scene. This is an intermediate level tutorial. You should be familiar with standard lights and shadows in 3ds max before doing this exercise.

Detailed tutorial about creating lightning. Making some lightning can be useful to simulate storms, electric arcs, etc… Sure you can also add some sparks, smoke, rain and a lot of things for a more realistic effect. To make this lightning you’ll need the Lightning Digimation Plug-in and the glow Video post plug-in. With of these two plug-ins we can create this picture.

Mental Ray Light & Render Setup
In this video tutorial of www.renderray.com, we will work on the Exterior Light setup, Render settings & HDRI, Environment Effects And Mental Ray Photographic Exposure Control setup to make a realistic and professional render.

Modelling a building in 3DS Max
In this tutorial I will show you how I modeled a building in 3ds max as it gives you the tools to model quickly without the perfect accuracy which isn’t necessary in the design stage. This tutorial focuses on translating an idea or sketch into a model.

I have always believed that the smaller details are the ones that make the difference. Having said that, this tutorial isn’t about making your model from scratch, its about taking your creature (dragon, serpent, orc, demon etc’) and giving it personality with those details.

This is a simple tutorial that will teach you how to build a necklace with 2 hearts. The techniques that will be used are edit mesh and mesh smooth.

This tutorial explains the process of creating normal maps which are used to give the illusion that real-time models have more detailed surfaces. The tutorial shows several techniques for creating normal maps and gives step by step instructions. Part 1 | Part 2.

This tutorial covers everything you need to know about occlusion passes in 3 simplified parts.

Creating a Photo-Realistic Orange using the Material Editor and Lofting. The purpose of this tutorial is to give you an understanding of lighting and texturing as well as a basic understanding of some lofting techniques. I can’t stress enough about how important lighting and texturing is when modeling. These two things determine what your picture looks like. Will it look cartoony, or realistic? There aren’t many tricks to texturing and lighting.

Creating a simple previewer with MXS. When making a MaxScript you have an option to make a script with an interface or just a script that will automate a sequence of events. In this tutorial I will be showing you how to design an interface script that will allow you to preview your scenes quickly. Previewers are good for doing motion checks, checking lighting, or whatever you may want to use it for.

This tutorial covers the major points of producing this image, starting with the planning and covering the modeling, texturing, lighting, rendering and compositing. I will also share a few tips and tricks as I show the process

Many of the 3D-artists at least once faced the need or desire to make the wireframe rendering. And they asked questions like: How to render wireframe in V-Ray or Mental Ray? How to perform the isoline render? How to make a shaded mesh rendering? How make a post production to a wireframe rendering? These are the questions this tutorial will answer and will show the easy and usable ways of creating model’s mesh renderings.

Making a Realistic Self Portrait by Kris Kaufman.

This tutorial learn you how to make Space scene (view to the Earth). It’s very simple, step by step tutorial for beginners and intermediate 3ds Max users. There are three chapters: 1. Modeling, 2. Materials and 3. Lighting.

Many people avoid adding Aztec and other interesting patterns to their textures (or use generic patterns), believing that it takes too much time to draw original patterns, and thier models suffer as a result. This tutorial will show you that this is not at all true, with the right software and a little planning you can make complex patterns with ease.

In this tutorial we’ll be looking at techniques for using textures and materials to create realistic objects. I’ll be using 3D Studio MAX as an example but you can easily apply these techniques in any other package.

Text Effect in 3D Max
This tutorial “How to Make 3D Text Effect in 3D Max” is based on very basic techniques of 3D text making. This tutorial is written specially for beginners in 3D max. They can learn many techniques from this.

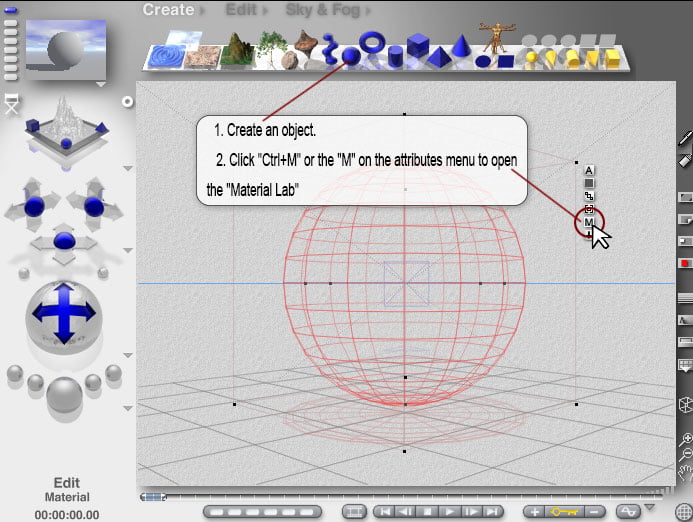
Learn the basics of creating materials and applying the necessary mapping coordinates to the mesh.

Note: Not a Maya Tutorial but, useful to Max users.
This is an attempt to explain the live action shooting process for VFX supervisors. Many people trained in 3D and Compositing have never stepped foot onto a tv or film set and it can be quite unnerving. Whilst there’s nothing like experience I hope this guide can help smooth out some of the jargon and complexities.

VRayPhysicalCamera – Switching to standard Camera
It is important to know how you can go to a standard camera therefore, even if the scene was originally set up to work with V-Ray Camera. This wouldn’t take much effort.

Using AutoCAD 3D model &3D Studio VIZ. This tutorial shows how to create an animated walkthrough of your AutoCAD 3D model using 3D Studio VIZ. All you need to start is an AutoCAD drawing with some 3D content. The end result will be a .AVI file which can be viewed on any Windows PC. AVI files can also be embedded within PowerPoint presentations along with text and other graphics to really demonstrate your design proposals.
# | A | B | C | D | E | F | G | H | I | J | K | L | M | N | O | P | Q | R | S | T | U | V | W | X | Y | Z