3D Butterfly Tutorial 1 – Bryce 3D and Photo Realistic Textures in Photoshop – Part 1
3D Monarch Butterfly
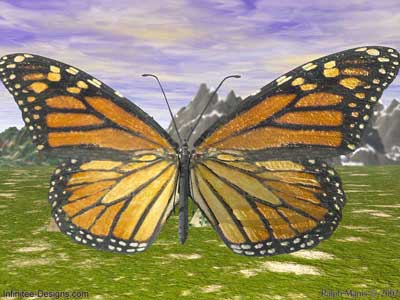
Learn how to model and render a Monarch Butterfly – In this tutorial you will learn how to model realistic butterfly wings and body parts using the Symmetrical Lattice and the Terrain Editor in Bryce 3D. Then we will show you how to texture the Butterfly with photo realistic precision with Adobe Photoshop.
For this tutorial you will need a basic understanding of Poser, Bryce 3D and Adobe Photoshop, Paint Shop Pro or any another painting program. These techniques can be applied with other similar programs but, were written for these in particular. A note to intermediate and advanced users: I tried to make this tutorial as comprehensive and detailed as possible for new users. Please bare this in mind when the explanations seem a bit obvious and repetitive.
*Tip: Where ever you see: (Ctrl+S) or (Ctrl+Shift+N) or something similar, these are “Keyboard Shortcuts” or “Key Strokes” By holding down these keyboard combinations together, they will manifest different commands. It is a good practice to use them when ever you can. In time they will become second nature and speed up your workflow.
You may download the entire model with texture maps here or, from the Bryce 3D free downloads page.
3D Butterfly Tutorial 1 – Preparing images for 3D model with Photoshop
Acquiring initial image and preparing it in Photoshop
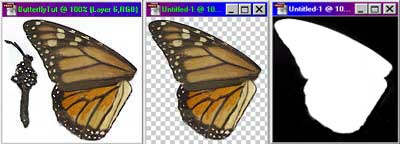
Scan or Photo | Isolated Wing | Alfa Layer
The basic image to create a wing texture and a Wing Alfa image.
The first thing you will need is a real butterfly or a very good high resolution photograph of one. I used a real butterfly wing and placed it in my scanner and scanned it at 300dpi. I have also used my digital camera with the same results.
1. Open your photographed or scanned image in Photoshop and using all the selection tool at your command like the Magnetic Lasso and isolate the wing as seen above.
2. Press (Ctrl+C) to copy it.
3. Press (Ctrl+N) to open a new page. Press (Ctrl+P) to paste the copy into the new page. Don’t worry about the size and resolution, it will be the same size of the selected wing but, make sure “Contents” is set to transparent and select OK or Enter. Save as WingTexture.psd and click OK or Enter.
4. Select Image> Image Size and in the Pop Up window change the highest number, (whether it is the width or height) to 512 and click OK or Enter. From the menu select Image > Canvas Size and make the Width and Height both 512. Leave Anchor in the middle and click OK or Enter. Adjust the background so it is all black.
5. Select: Image>Duplicate, then name the new image WingAlfa and click OK.
6. Press (D) to make sure that your foreground/background is set to Default black and white.
7. Click New Layer button 
8. Press (Shift+back arrow) ![]() to fill it with black.
to fill it with black.
9. Press (Ctrl+layer that the wing is in) to select the shape of the wing.
10. Click New Layer button 
11. Select: Filters> Blur> Gaussian Blur. Set Radius to 0.5. This will smooth and round edges in Bryce.
12. Click the arrow in the upper right corner of the layers palette. In the drop down menu select “Flatten Image”
13. Press (Ctrl+S) to save and name the file WingAlfa.psd and click OK.
Isolating the Individual Body Parts
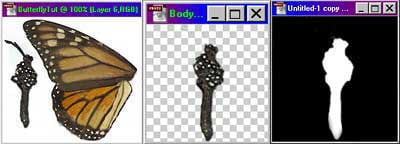
Using Original image to create 1 Body texture and 1 Body Alfa Layer image
14. Follow the same steps for the wing to create the “Butterfly Body” images.
14a. Select: Filters> Blur> Gaussian Blur. Set Radius to 21. This will smooth and round edges in Bryce.
Isolate the Antennae Texture and Alfa Images
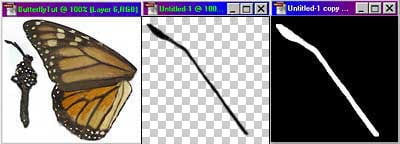
Using Original image to create 1 Antennae texture and 1 Antennae Alfa Layer image
15. Follow the same steps for the wing to create the “Butterfly Antennae” images.
15a. Select: Filters> Blur> Gaussian Blur. Set Radius to 5. This will smooth and round edges in Bryce.
Isolate the Leg Texture and Alfa Images
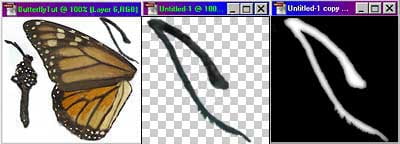
Using Original image to create 1 Antennae texture and 1 Antennae Alfa Layer image
16. Follow the same steps for the wing to create the “Butterfly Leg” images. You will only need to make one. You can duplicate it in Bryce to make the rest.
16a. Select: Filters> Blur> Gaussian Blur. Set Radius to 5. This will smooth and round edges in Bryce.
* Tip: The more Gaussian Blur that you add to your Alfa images the more rounded they will be when modeled in Bryce.
* Tip: You should have an one original image, one Wing Texture, one Wing Alfa, one Body Texture, one Body Alfa, one Antenna Texture, one Antenna Alfa, one Leg Texture and one Leg Alfa.
3D Butterfly Tutorial 1 –

