Part 8 – Adding Texture Maps to Model Objects Bryce 3D tutorials
Applying Materials for Photorealism
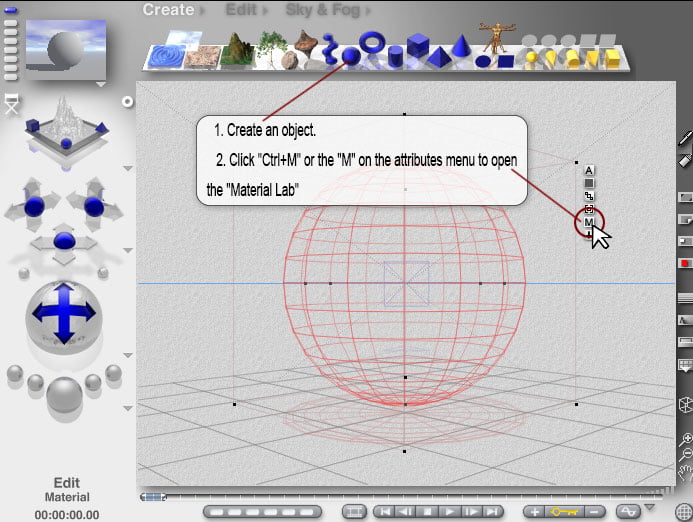
Bryce 3D Material Lab
Make sure you are in "Camera View" and select one of the Wings either by clicking on it or by Family Color.
* Tip: Note that the "Texture Source Editor" button is pink. And the column select buttons are purple .
1. Open Material Lab- Click the "M" or (Ctrl+M) to open the "Material Lab"
1a. Select Diffuse and Ambient in the "A" column.
1b. Click the "Image Texture" button (the one with the "P" on it) and "Leo" will appear in the display window .
1c. Click the "Texture Source Editor" button
Import Images
Bryce 3D Picture Editor
2. Importing the Texture Images-
2a. For the first large window click "Load" In the pop up menu find and select your WingTexture.psd.
2b. Next, in the first large window click "Copy"
2c. In the second large window click "Paste" and in the pop up menu select "Delete" Leave the third window as it is and click the finish check mark . In the Material Lab hit the finish check mark .
3. Repeat above steps to add texture map to the other wing.
Selecting all the objects
Selecting all of the Objects
1. Hold down Ctrl and click on the Body.
1a. Click "M" or (Ctrl+M) Select Diffuse and Ambient in the "A" column.
1b. Click the "Image Texture" button (the one with the "P" on it).
1c. Select the next available "Extra Picture" box/window
1d. Click the "Texture Source Editor" button. Click the next available small box in the first row. In the pop up window find and open your BodyTexture.psd file.
1e. Click "Copy" (bottom left) of the first large window and paste (bottom right) of the second large window. In the pop up click "Delete" and then the finish check mark . In the Material Lab hit the finish check mark .
2. Repeat these steps for the Left and Right Antenna’s. You can use the same texture image for both the right and left Antennae objects.
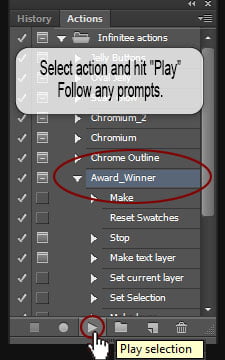
Select an action to activate it and run the action by clicking the “Play” arrow on the bottom of the Actions Window.
Load Actions
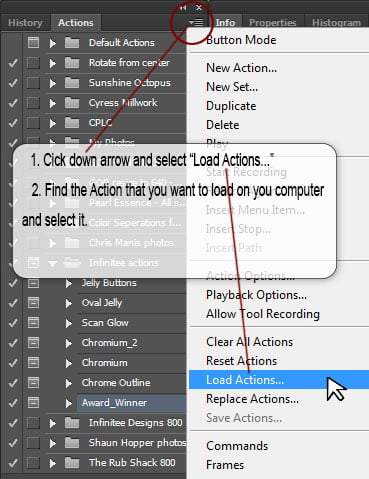
In the upper right hand corner of the Actions window, hit the down arrow and then, “Load Actions”
Select Bryce Material
Open Bryce Materials Lab
Bryce Materials Lab
How to Use These Free Maya 3D Models
How to Use These Free Maya 3D Models
To use these free models… After downloading, double click to unzip the file and then copy/paste file to any folder you desire.
Open Maya and hit: File > Import Option Box > Edit > Reset Settings > Import. Find the folder that you placed the model file into and select.
These models are free for personal use as long as you have fun with them and hopefully learn more about 3D modeling, animation and special effects! Whenever possible, please give credit to Infinitee Designs and a link to https://www.infinitee-designs.com is always appreciated. Please let me know what you create, I would love to see what you do with them.
Enjoy,
Ralph Manis
Infinitee Designs
Free Downloads Agreement
Infinitee Designs Free Downloads and Submissions Agreement
By downloading any of the 3D models, wallpaper, tutorials or, any other free stuff from the Infinitee Designs Website you and/or, your company explicitly agree with these following terms and conditions:
Infinitee Designs and all it’s content is copyrighted by Infinitee Designs and Ralph Manis, with the exception of the artist of the Month exhibits in which content is copyrighted the respective artists. All of the models, wallpaper, texture maps and free stuff available on the Infinitee Designs Website maybe used royalty free in your own work but, may not be redistributed, sold, used in part or, in whole for any commercially or, for profit related purposes of any kind without written permission.
If your are submitting your models and or, images for addition to the artist of the Month exhibits or, to be offered in our free stuff for artists section of the Infinitee Designs Website, you state that you are the true creator and copyright owner of the submitted material. Also, you and or, your company agree to willingly and fully grant Infinitee Designs the rights to distribute the submitted works without compensation with these same restrictions to the general public. Of course, you will retain all copyrights to your rightful submissions and will be given full credit as to ownership and not hold either Infinitee Designs or, Ralph Manis responsible for any misuse of your material.
Thank you for being and helping your fellow artists!
Ralph Manis
Infinitee Designs
How to Use These Bryce 3D Materials
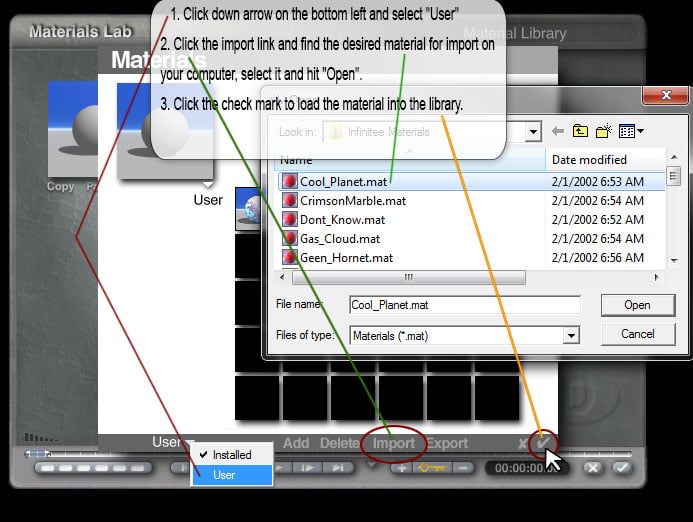
Free Bryce 3D Materials Downloads – Multi use materials that can be applied to any object in Bryce 3D. Download, unzip and save to a folder of your choice. Open Bryce 3D, create an object and click “Ctrl+M” or the “M” in the attributes menu to open the “Material Lab” Click the arrow top right of the preview window to open the materials library. Click “User” then, the import link and find the desired material for import on your computer and select it and open. Click the check marks to apply to the object.
These materials are intended to aid in educating students and speed up projects for advanced users and production houses. They are for personal and or, commercial use and please, feel free to enhance them in any way you like. Anyone that would like to submit a material for the Bryce users community are welcome to do so by contacting me. Enjoy!
By downloading, you agree to the Free Downloads Agreement.
How to Use These Bryce 3D Materials
To use these free materials… After downloading, double click to unzip the file and then copy/paste file to the folder of your choice.
How To Import a Material into Bryce:
Open Bryce and create a simple default object.
Click “Ctrl+M” or the “M” on the attributes menu to open the “Material Lab”.
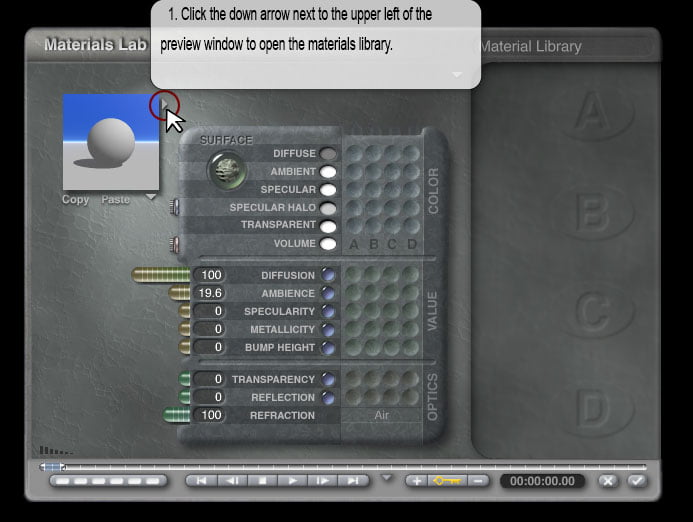
Click the down arrow next to the upper left hand window to open the materials library.
Click down arrow on the bottom left and select “User”.
Click the import link and find the desired material for import on your computer, select it and hit “Open”.
Click the check mark to load the material into the library.
To Apply a Material to an Object:
Open Bryce and create a simple default object or, open one of your own.
Click “Ctrl+M” or the “M” on the attributes menu to open the “Material Lab”
Click the down arrow next to the upper left hand window to open the materials library.
Click down arrow on the bottom left and select “User” library.
Click material to select it and hit the check mark to apply it.
You can then tweak it to your hearts desire. Click the check mark to apply to object.
These materials are free for personal and commercial use as long as you have fun with them and hopefully, learn more about 3D modeling, animation and special effects! Please let us know what you create, I would love to see what you do with them.