Part 3 – Creating the Wings with the Symmetrical Lattice and the Bryce 3D Terrain Editor
Positioning the Wing and Duplicating
Clicking "Control Handles" and holding down Ctrl+Drag to rotate objects .
Rotating Wing Model Object
1. Click Wing to select it if it’s not already selected. Click the Magnify button one or two times to zoom in on the project. this will only effect the window view and will not change the final render size or resolution.
2. Place cursor/pointer over the right "X" axis, press and hold Ctrl., the "Rotate" icon will appear now, still holding down Ctrl, drag to to the right to rotate it -90° so that it is facing the camera. Or, Click the "A" and in the "Object Attributes" pop up menu type -90 degrees in the Rotate X axis box (under the General tab). Click the Check Mark or press Enter.
3. Place cursor/pointer over the top "Y" axis, press and hold Ctrl, the "Rotate" icon will appear now, still holding down Ctrl, drag to to the right to rotate it -45° so that it is facing the camera. Or, Click the "A" and in the "Object Attributes" pop up menu type -45 degrees in the Rotate X axis box (under the General tab). Click the Check Mark or press Enter.
4. Click the "A" and in the "Object Attributes" pop up menu in the Object Name box type "Left Wing" and set the Size "Y" to 0.05. Click the Check Mark or press Enter.
5. Click the "Edit Family" button directly underneath the "Objects Attributes" button and select a color for the Object and type in "Left Wing" to name the family color.
6. Click Wing to select it if it’s not already selected. Click the Magnify button one or two times to zoom in on the project. this will only effect the window view and will not change the final render size or resolution.
The Object Attributes Pop Up Settings
Wing Attributes…
Origin X: -19.87, Y: 30.68 and Z: 21.32
Rotate X: -90, Rotate Y: -45 and Z: 0
Size X: 20.48, Y: 0.5 and Z: 20.48
Apply the Above Attribute Settings
1. Set Wing attributes to the above settings.
* Tip: When moving objects, make sure you don’t click and drag on one of the re-sizing (corner) handles.
* Tip: Use the "Zoom In", "Zoom Out" and "Pan" tools (at the bottom lower right corner of scene window) to adjust the view of your scene. This does not effect objects or the camera position, just how it is viewed in the scene. Rendering will occur full screen.
* Tip: As you are selecting individual objects it is a good practice to rename them in the "Objects Attributes" editor’s "General" information tab.
* Tip: You can also create a "Family" by clicking the "Edit Family" button directly underneath the "Objects Attributes" button. Doing this allows you to give individual or groups of objects a color and a name. This makes it possible to quickly select these designated groups of objects by clicking the "Time/Selection Palette Toggle" (on the lower right corner) then the "Select Families" button . This is extremely helpful when working with complex scenes with large quantities of objects.
* Tip: To add an object to a family: Click an object to select it then click the "Edit Family" button chose a color and type in a name for the family. Now you can select any other objects in your scene and click the "Edit Family" button and add it to one of your families by selecting the color of a family.
Duplicating the Left Wing and Positioning the Right Wing
Duplicate Left Wing to make Right Wing then holding down Ctrl+Drag to rotate object .
1. Click the "View" arrow and select From Top.
2. Press (Ctrl+D) to duplicate the Left Wing.
4. Click the "A" and in the "Object Attributes" pop up menu in the Object Name box type "Right Wing" and set the Size "Y" to 0.05. Click the Check Mark or press Enter.
5. Click the "Edit Family" button directly underneath the "Objects Attributes" button and select a color for the Object (a different color than the left wing) and type in "Right Wing" to name the family color.
6. Place cursor/pointer over the right "Y" axis, press and hold Ctrl., the "Rotate" icon will appear now, still holding down Ctrl, drag to to the right to rotate it 45° so that it is facing the camera. Or, Click the "A" and in the "Object Attributes" pop up menu type 45 degrees in the Rotate Y axis box (under the General tab). Click the Check Mark or press Enter.
7. Click and drag the Right Wing so that it is in line with the Left Wing or add the attributes below.
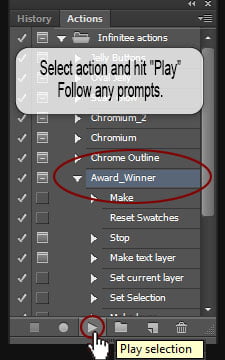
Select an action to activate it and run the action by clicking the “Play” arrow on the bottom of the Actions Window.
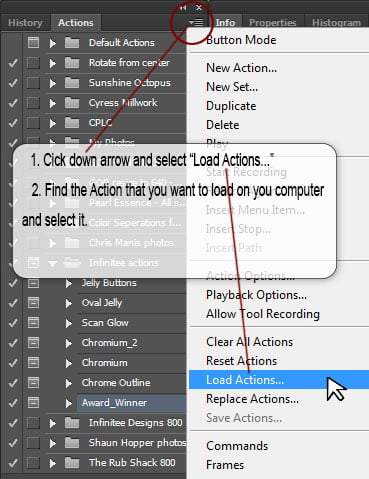
Load Actions
In the upper right hand corner of the Actions window, hit the down arrow and then, “Load Actions”
Select Bryce Material
Open Bryce Materials Lab
Bryce Materials Lab
How to Use These Free Maya 3D Models
How to Use These Free Maya 3D Models
To use these free models… After downloading, double click to unzip the file and then copy/paste file to any folder you desire.
Open Maya and hit: File > Import Option Box > Edit > Reset Settings > Import. Find the folder that you placed the model file into and select.
These models are free for personal use as long as you have fun with them and hopefully learn more about 3D modeling, animation and special effects! Whenever possible, please give credit to Infinitee Designs and a link to https://www.infinitee-designs.com is always appreciated. Please let me know what you create, I would love to see what you do with them.
Enjoy,
Ralph Manis
Infinitee Designs
Free Downloads Agreement
Infinitee Designs Free Downloads and Submissions Agreement
By downloading any of the 3D models, wallpaper, tutorials or, any other free stuff from the Infinitee Designs Website you and/or, your company explicitly agree with these following terms and conditions:
Infinitee Designs and all it’s content is copyrighted by Infinitee Designs and Ralph Manis, with the exception of the artist of the Month exhibits in which content is copyrighted the respective artists. All of the models, wallpaper, texture maps and free stuff available on the Infinitee Designs Website maybe used royalty free in your own work but, may not be redistributed, sold, used in part or, in whole for any commercially or, for profit related purposes of any kind without written permission.
If your are submitting your models and or, images for addition to the artist of the Month exhibits or, to be offered in our free stuff for artists section of the Infinitee Designs Website, you state that you are the true creator and copyright owner of the submitted material. Also, you and or, your company agree to willingly and fully grant Infinitee Designs the rights to distribute the submitted works without compensation with these same restrictions to the general public. Of course, you will retain all copyrights to your rightful submissions and will be given full credit as to ownership and not hold either Infinitee Designs or, Ralph Manis responsible for any misuse of your material.
Thank you for being and helping your fellow artists!
Ralph Manis
Infinitee Designs
How to Use These Bryce 3D Materials
Free Bryce 3D Materials Downloads – Multi use materials that can be applied to any object in Bryce 3D. Download, unzip and save to a folder of your choice. Open Bryce 3D, create an object and click “Ctrl+M” or the “M” in the attributes menu to open the “Material Lab” Click the arrow top right of the preview window to open the materials library. Click “User” then, the import link and find the desired material for import on your computer and select it and open. Click the check marks to apply to the object.
These materials are intended to aid in educating students and speed up projects for advanced users and production houses. They are for personal and or, commercial use and please, feel free to enhance them in any way you like. Anyone that would like to submit a material for the Bryce users community are welcome to do so by contacting me. Enjoy!
By downloading, you agree to the Free Downloads Agreement.
How to Use These Bryce 3D Materials
To use these free materials… After downloading, double click to unzip the file and then copy/paste file to the folder of your choice.
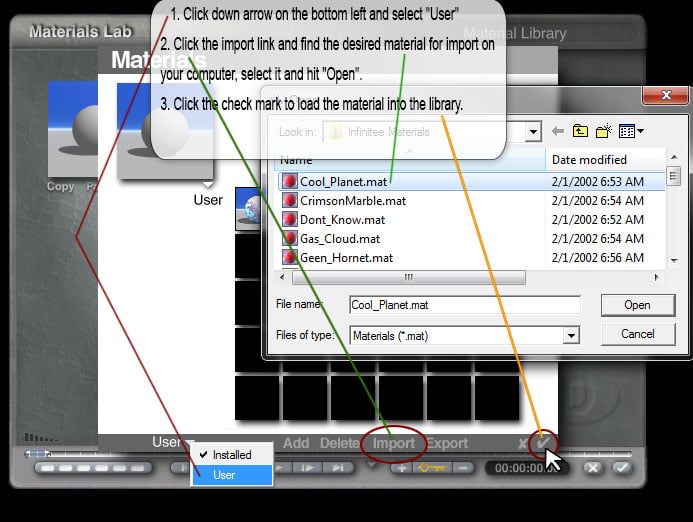
How To Import a Material into Bryce:
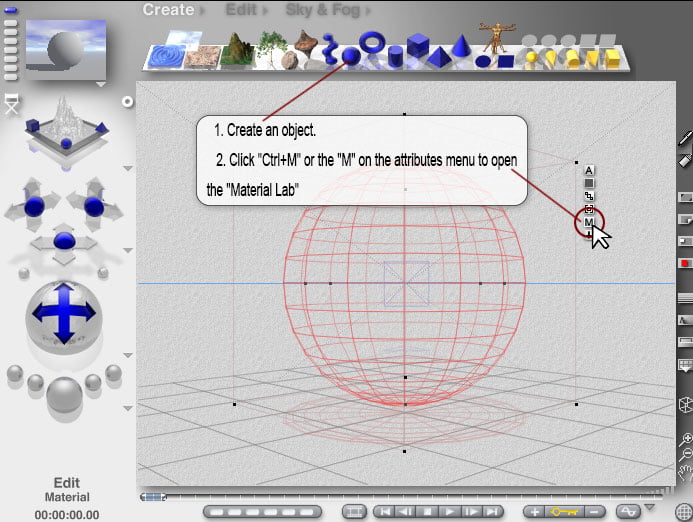
Open Bryce and create a simple default object.
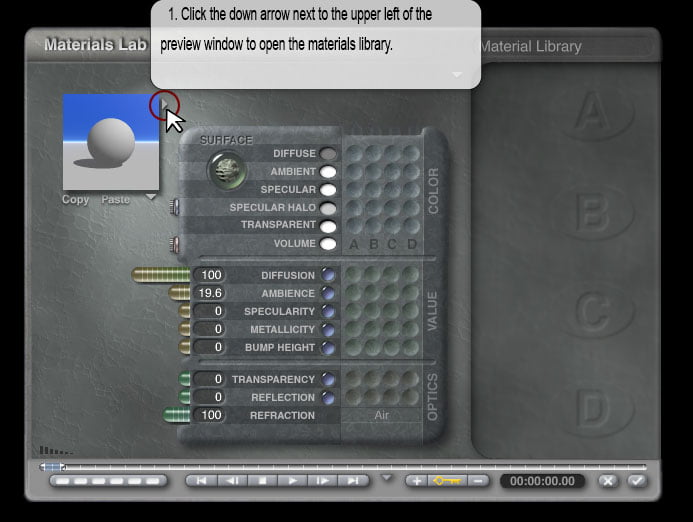
Click “Ctrl+M” or the “M” on the attributes menu to open the “Material Lab”.
Click the down arrow next to the upper left hand window to open the materials library.
Click down arrow on the bottom left and select “User”.
Click the import link and find the desired material for import on your computer, select it and hit “Open”.
Click the check mark to load the material into the library.
To Apply a Material to an Object:
Open Bryce and create a simple default object or, open one of your own.
Click “Ctrl+M” or the “M” on the attributes menu to open the “Material Lab”
Click the down arrow next to the upper left hand window to open the materials library.
Click down arrow on the bottom left and select “User” library.
Click material to select it and hit the check mark to apply it.
You can then tweak it to your hearts desire. Click the check mark to apply to object.
These materials are free for personal and commercial use as long as you have fun with them and hopefully, learn more about 3D modeling, animation and special effects! Please let us know what you create, I would love to see what you do with them.