Part 6 – Creating the 3D Butterfly’s Legs with the Symmetrical Lattice and the Bryce 3D Terrain Editor
Setting up the Terrain Editor

Terrain Editor Setup
1. With "Elevation" selected and highlighted, click the New button ![]() .
.
2. Click the Grid button ![]() and in the drop down menu select "512 – ultra fine.
and in the drop down menu select "512 – ultra fine.
3. Click the Down Arrow button ![]() just under the Grid button and in the drop down menu select "Solid", "Smooth" and "Keep Gradient"
just under the Grid button and in the drop down menu select "Solid", "Smooth" and "Keep Gradient"
Import Leg Alfa image and set depth

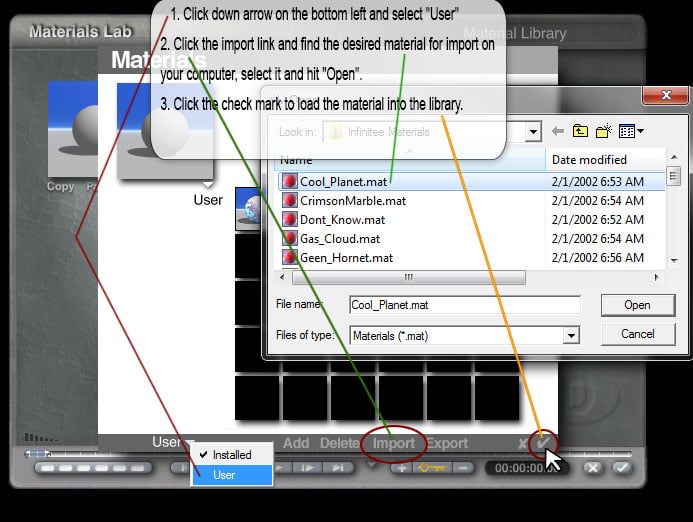
Importing Leg Alpha Image
1. Select "Pictures" Above the first pictures window select "Load" then in the lower left corner select ‘Copy"
2. In the second pictures window select "Paste"
3. Click and hold the bottom of the "Elevation Slider Bar" and drag it upwards to the middle of the scale and click the "Check Mark" 
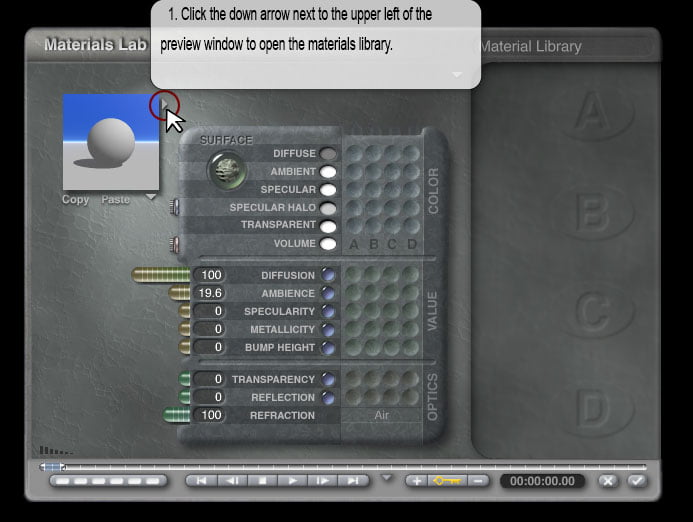
4. Click the "View" arrow ![]()
Positioning the Leg
1. Place cursor/pointer ![]() over the right "X" axis, press and hold Ctrl., the "Rotate" icon will appear
over the right "X" axis, press and hold Ctrl., the "Rotate" icon will appear 

2. Place cursor/pointer ![]() over the top "Y" axis, press and hold Ctrl, the "Rotate" icon will appear
over the top "Y" axis, press and hold Ctrl, the "Rotate" icon will appear
3. Click the "A"
4. Click the "Edit Family" button 
Lower Left Leg Object Attributes

Lower Left Leg Attributes…
Origin X: -20.41, Y: 28.44 and Z: 21.51
Rotate X: -79, Y: 0 and Z: -31.50
Size X: 5.75, Y: 0.38 and Z: 5.76
Apply Above Attributes to the Leg Object
Duplicating and positioning Legs
1. With the left leg selected, press Ctrl+D to duplicate it.
2. Hold down the Alt key, click ![]() and drag to the right to move the new leg up a little.
and drag to the right to move the new leg up a little.
3. Click the "A"
4. Click the "Edit Family" button
Upper Left Leg Object Attributes

Upper Left Leg Object Attributes…
Origin X: 19.66, Y: 32.89 and Z: 21.59
Rotate X: -79, Y: 0 and Z: -31.50
Size X: 2.88, Y: 0.19 and Z: 2.88
Apply the Above Attributes to the Upper Left Leg
5. With the Upper Leg still selected, hold down Ctrl and click ![]() the lower Left Leg. In the pop up window list, hold cursor
the lower Left Leg. In the pop up window list, hold cursor ![]() over the the Left Leg and while holding down Ctrl+Shift and click to select both legs together.
over the the Left Leg and while holding down Ctrl+Shift and click to select both legs together.
6. Once both legs are selected, hit the Group button ![]() ,
,
7. Click the "A"
< Prev 1 2 3 4 5 6 7 8 9 Next >